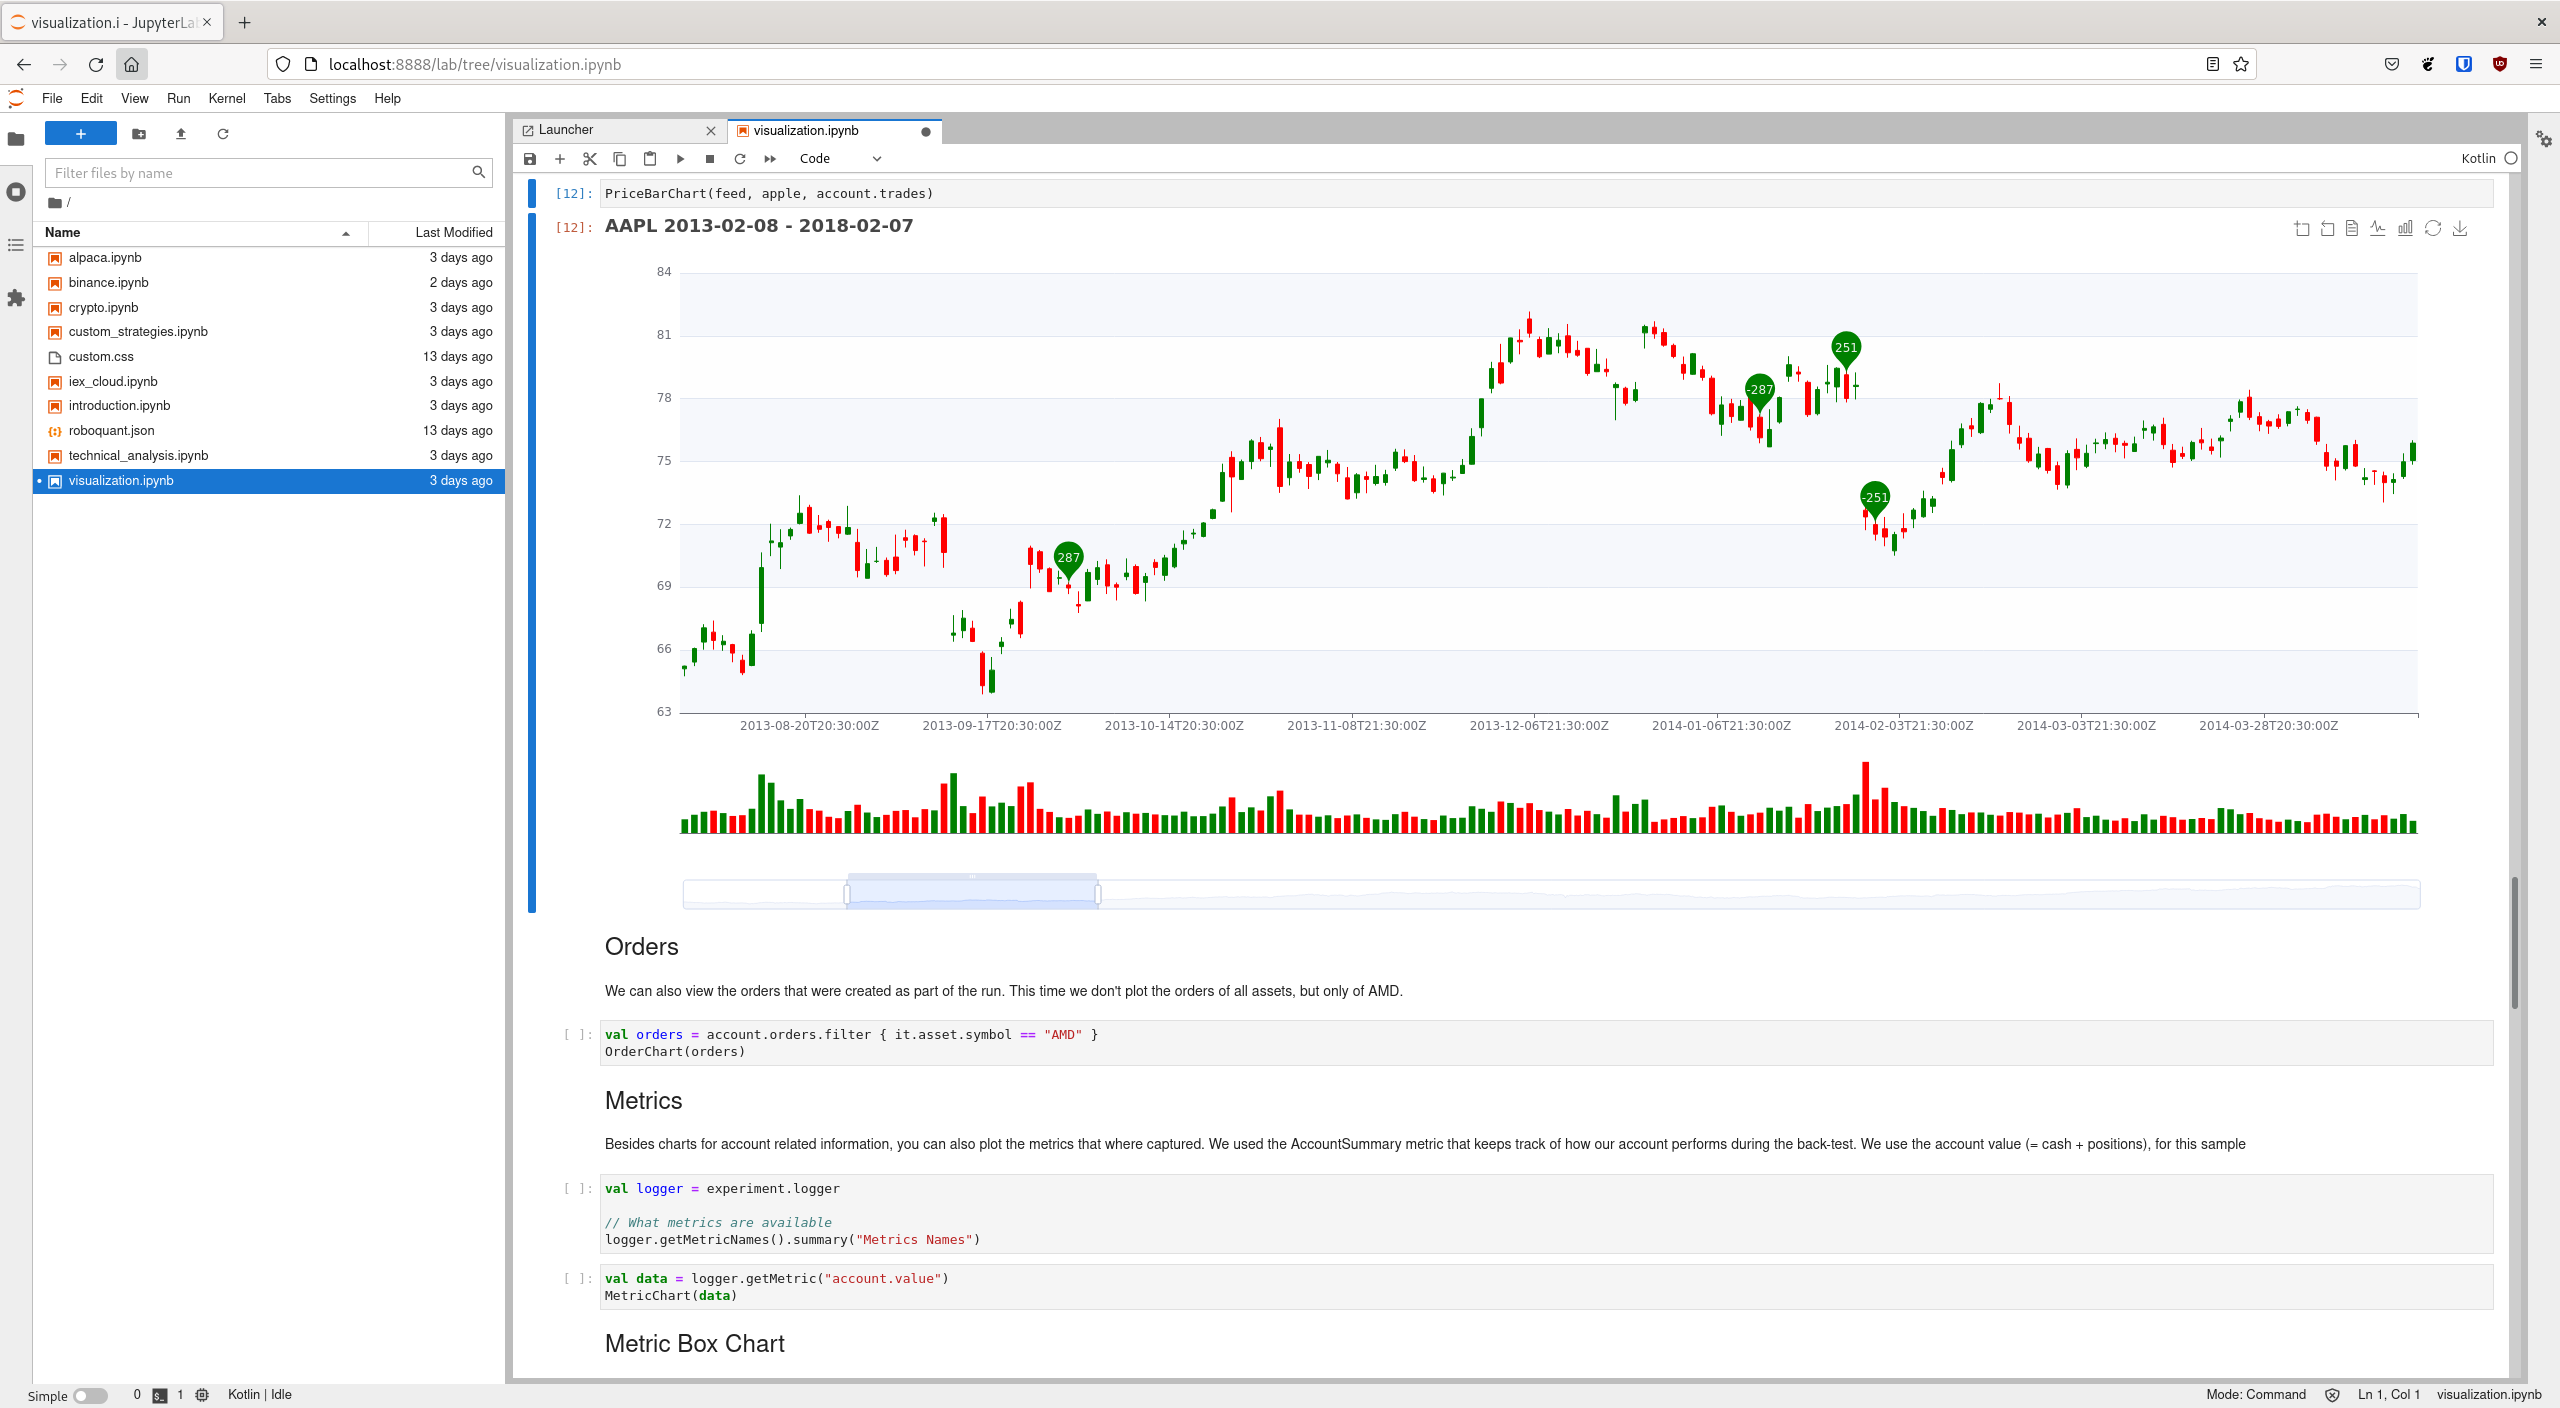
Interactively in a Jupyter Notebook. If you want to be up and running quickly, this is the easiest approach. Additionally, you get many charts out-of-the-box that help you to understand how the strategy is performing.
There are two ways to install and use roboquant:
Interactively in a Jupyter Notebook. If you want to be up and running quickly, this is the easiest approach. Additionally, you get many charts out-of-the-box that help you to understand how the strategy is performing.
As a library in your standalone Kotlin or Java application. If you plan to develop large and complex trading strategies, this is a good approach since you’ll have the full power of an IDE like IntelliJ IDEA at your disposal.
If you don’t want to install anything on your local machine, you can try any of the included notebooks right now by clicking on one of the two following badges:
Jupyter Classic: ![]()
Jupyter Lab: ![]()
However, if you have already Docker installed on your local machine, all it takes is a single command to have a fully functional Jupyter Notebook environment with roboquant available that is ready to use.
docker run -p 8888:8888 roboquant/jupyterBy default, this will start a new Jupyter-Lab environment. The installation comes with several how-to notebooks included that demonstrate how to develop and run your own strategies.
The following startup command shows some useful additional options that you can use:
dispose of the container as soon as you stop the container (the --rm option)
use a predefined token, so you don’t have to look at the output to find out the token to use
map your local working directory to the work directory in the docker container
start a classic notebook rather than a Jupyter Lab environment
docker run                              \
  --rm                                  \
  -p 8888:8888                          \
  -e JUPYTER_TOKEN="my-secret"          \
  -e DOCKER_STACKS_JUPYTER_CMD=notebook \
  -v "${PWD}":/home/jovyan/work         \
  roboquant/jupyter
If you don’t have Docker yet installed on your computer, check out the Docker get started page and download Docker Personal from there. If you are running Linux, then your distribution likely already has Docker or Podman included.
You can also install Jupyter-lab and the Kotlin kernel directly on your machine if you already have Python installed:
pip install jupyterlab
pip install -i https://test.pypi.org/simple/ kotlin-jupyter-kernel| Roboquant requires a new version of the Kotlin kernel, so be sure to use the dev channel as in the above example. See also Kotlin Kernel for more information. |
Just add roboquant as a dependency to your build tool, like Maven or Gradle. Regular versions of the Roboquant modules are published to Maven Central and snapshots are published to OSS Sonatype (https://s01.oss.sonatype.org/content/repositories/snapshots).
The latest available versions:
regular release:
snapshot release:
The following modules are available for inclusion in your application:
roboquant: the core module of the platform
roboquant-binance: adds support for binance
roboquant-xchange: adds support for many of today’s popular crypto exchanges via the XChange library
roboquant-alpaca: adds support the Alpaca broker and their market data feeds
roboquant-polygon: adds support for Polygon data feeds
roboquant-alphavantage: adds support for AlphaVantage data feeds
roboquant-server: enables to control your runs via a web interface, ideal for hosting on remote servers
roboquant-charts: integration with the Apache ECharts library
roboquant-ibkr: adds support for Interactive Brokers
roboquant-ta: over 150 technical analysis indicators and strategies using Ta-Lib or Ta4j
roboquant-jupyter additional Jupyter Notebook
roboquant-performance contains a series of performance tests, mostly useful to evaluate specific hardware
Add the following snippet to your pom.xml file in the dependencies section:
<dependency>
    <groupId>org.roboquant</groupId>
    <artifactId>roboquant</artifactId>
    <version>VERSION</version>
</dependency>
Or if you want to create your own new algo-trading project, you can run the Maven Archetype that is available for roboquant:
mvn archetype:generate                          \
-DarchetypeGroupId=org.roboquant                \
-DarchetypeArtifactId=roboquant-quickstart      \
-DarchetypeVersion=2.0.0                        \
-DgroupId=org.mydomain                          \
-DartifactId=myapp                              \
-Dversion=1.0-SNAPSHOT
Change the last three lines to your own settings.
This will create a fully functional Kotlin Maven project with a small sample strategy. It can be run from the command line or imported in an IDE like IntelliJ IDEA.
Include the following line in your build.gradle script:
implementation group: 'org.roboquant', name: 'roboquant', version: 'VERSION'First start with cloning the roboquant GitHub repository to your local disk. The quickest way to be up and running is then to install IntelliJ IDEA (either the free community edition or the paid Ultimate version) and open the directory you just cloned. IntelliJ IDEA will recognize it as a Kotlin/Maven project, and you can build it and run test directly from the IDE.
Roboquant uses a directory setup that is similar to most other Kotlin projects:
root
    roboquant
        src/main/kotlin
        src/test/kotlin
    roboquant-server
        src/main/kotlin
        src/test/kotlin
    ...
All source code is written in Kotlin, so there are no Java or other language source files. Roboquant uses Maven for the build process and includes a Maven wrapper (mvnw) to ensure optimal compatibility between environments.
Building the libraries locally is as easy as running a single command:
./mvnw installThe build and install is tested using the JDK 17 runtime.
The following script shows how to get everything to build based on a clean Ubuntu 22.04 installation (like the one you can select when starting an AWS EC2 instance)
sudo apt update -y
sudo apt install -y git openjdk-17-jre-headless
git clone https://github.com/neurallayer/roboquant.git
cd roboquant
./mvnw install
When the ./mvnw install process has successfully finished, you should see something like this:
[INFO] roboquant parent ................................... SUCCESS [  0.252 s]
[INFO] roboquant .......................................... SUCCESS [  7.795 s]
[INFO] roboquant avro ..................................... SUCCESS [  0.887 s]
[INFO] roboquant charts ................................... SUCCESS [  1.202 s]
[INFO] roboquant ta ....................................... SUCCESS [  1.115 s]
[INFO] roboquant ml ....................................... SUCCESS [  0.167 s]
[INFO] roboquant jupyter .................................. SUCCESS [  0.499 s]
[INFO] roboquant alphavantage ............................. SUCCESS [  0.064 s]
[INFO] roboquant alpaca ................................... SUCCESS [  0.161 s]
[INFO] roboquant polygon .................................. SUCCESS [  0.113 s]
[INFO] roboquant xchange .................................. SUCCESS [  0.156 s]
[INFO] roboquant binance .................................. SUCCESS [  0.098 s]
[INFO] roboquant server ................................... SUCCESS [  0.147 s]
[INFO] roboquant questdb .................................. SUCCESS [  0.124 s]
[INFO] roboquant ssr ...................................... SUCCESS [  0.329 s]
[INFO] roboquant performance .............................. SUCCESS [  0.046 s]
[INFO] ------------------------------------------------------------------------
[INFO] BUILD SUCCESS
[INFO] ------------------------------------------------------------------------
[INFO] Total time:  13.239 s
[INFO] Finished at: 2023-12-24T12:08:01+01:00
[INFO] ------------------------------------------------------------------------
By default, the Kotlin incremental compiler property is set to true (in the main pom.xml). This enables fast compilation if there are only a few changes made.
So additional compiles should typically take not more than a few seconds.
| If you plan to make regular large changes and updates to the roboquant source code, checkout the Maven Daemon project for even faster builds. |
Unfortunately, we are not allowed to redistribute the Interactive Brokers Java client, so you’ll have to download the TwsApi.jar file yourself. You can download the stable version 10.19 from here: https://interactivebrokers.github.io and within the downloaded archive file you’ll find the required TwsApi.jar.
Then install the jar file in your local Maven repository on your machine using the following command:
mvn install:install-file -Dfile=TwsApi.jar -DgroupId=com.interactivebrokers -DartifactId=tws-api -Dversion=10.19 -Dpackaging=jarIf this artefact cannot be found in your local Maven repository during a build, the module roboquant-ibkr will automatically be skipped. So if you don’t require integration with Interactive Brokers for your trading, you can skip this step altogether.

